Welcome to what might be your first introduction to FPV (first-person) drones — a hobby that has completely changed the RC world.
FPV drones come in all shapes and sizes, from tiny indoor quads to powerful long-range builds. When I first got started back in 2016, I really wished there had been a single, clear resource that laid everything out in one place.
Instead, I spent countless hours digging through manuals, forums, videos, and scattered guides just trying to understand what actually needed to begin. That’s exactly why I created these videos.
They’re designed to break the FPV learning curve into bite-sized, approachable chunks — helping you understand what’s required, while hopefully inspiring you to keep going.
My goal was simple: let someone watch the first video, grab a simulator and a radio, and confidently start their journey toward getting airborne.
There’s a lot that goes into getting started with FPV, which is why I encourage beginners to watch the videos all the way through without skipping around. Inside, you’ll find links to get your first radio, my favorite gear, essential tools, and even beginner-friendly DIY drone kits to help you move forward with confidence.
Download the FPV Buy List PDF before you shop.
Save it to your phone so you can use it while making purchases and avoid missing key gear.
Start here to understand the three pillars of modern FPV: radios, control protocols, and why simulators are the safest place to begin.
Why FPV Radio Protocols Matter
Your radio is the key to controlling your drone. Picking the right one is critical to ensure compatibility, expandability, and a smooth learning experience. Radios use specific protocols, which are essentially the “languages” they communicate in.
Popular protocols include:
Spectrum: An older standard, not as common anymore.
Taranis Frsky: Widely recognized but somewhat outdated.
Crossfire and Tracer: TBS's rock solid radio protocol. Crossfire excels at long-range FPV.
ELRS (ExpressLRS): Highly available, very well-liked, and currently the gold standard.
DJI: Proprietary to DJI systems. Includes the O3-O4 air units if using the DJI Remote. Note: If you use the DJI video system, you don't necessarily need a DJI radio! You can use whatever protocol you choose if you have a separate receiver.
Budget-Friendly vs. Advanced FPV Radios
Basic Kits
Starter FPV kits often include a basic radio. These are cheap and easy to use but come with limitations:
Often use proprietary protocols.
Cannot be used with other drones or upgraded.
Limited features and durability.
ELRS-Ready Kits
Newer kits, like those from BetaFPV, often feature ELRS protocols:
A versatile, accessible standard.
Compatible with various drones and radios.
Expandable with modules for advanced setups.
Expandable FPV Radios
If you plan to grow in the hobby, invest in a radio with modular expandability:
Crossfire Module: By TBS, excellent for long-range control.
ELRS Modules: Affordable and reliable for beginners and experienced pilots alike.
Best Radios for FPV Simulators
Choosing the right radio controller can greatly impact your experience. Here are some of the best radios for beginners:
RadioMaster TX16S: Best Overall. Multi-protocol, Hall sensor gimbals. ~$150.
TBS Tango 2: Best for Portability. Crossfire, game-controller feel. ~$200.
Whoops are cheap, durable, and indoor-friendly. This video breaks down why a small ducted quad is often the smartest first FPV drone.
Small Whoop Drones: The Perfect Start
Small whoop drones can be a great starting point for anyone curious about FPV (First-Person View) flying — it is how I got my start in FPV! These tiny, lightweight drones are fun, safe, and relatively easy to fly (once you practice in a sim!). Whether you want to practice indoors, learn acro, or just have fun zipping around your living room, small whoops give an easy onramp into an amazing hobby.
Smaller whoop drones are designed to balance performance, safety, and affordability. Their compact size and ducted propellers make them uniquely suited for flying indoors and in tight spaces. They’re lightweight enough to bounce off walls and furniture without causing damage—perfect for a first-time pilot.
Compact design: Small frames (usually under 65mm) that can fit in the palm of your hand.
Lightweight materials: Weighing under 25 grams without the battery, they’re moderately crash-resistant and easy to handle.
Battery-powered fun: Most run on 1S LiPo batteries, giving you 3–5 minutes of flight time per charge.
Affordable options: You can find a ready-to-fly kit for under $200.
Why Whoops Are Perfect for Beginners
Beginner-Friendly Flying: Stable flight modes (like Angle mode) help you get comfortable with the controls.
Safe Indoors: The ducted propellers reduce risks to people, while the lightweight frame protects walls and furniture. (Warning: they can get stuck in hair!)
Portability: Easy to store & pack, making them convenient to take almost anywhere.
Community Support: You’re never alone with a vibrant FPV community ready to share tips. 😉
NOTE: Repairs & Upgrades
If you buy a pre-built whoop, repairability will depend on the model. Parts may be specialized. Tiny Whoops built from scratch can be rebuilt from the ground up, but there is a learning curve. The bottom line is: if you’re in this hobby, YOU WILL NEED TO LEARN HOW TO FIX STUFF, so building a Tiny Whoop might be the best route!
What to Expect
The Good Stuff
Safe and Forgiving: Ideal for indoor flying. Crashes are rarely catastrophic.
Durable: Built to withstand impacts. Props and motors are easily replaceable.
Budget-Friendly: Get started for as little as $150–$499 with complete kits.
Silent Flying: Tiny whoops are relatively quiet. 😉
The Challenges
Short Flight Times: Batteries last 3–5 minutes. I advise buying 10-20 batteries and a bulk charger.
Limited Outdoor Use: Wind overpowers these drones super easily.
Lower Camera Quality: Analog video is common and can be grainy compared to digital. Digital is an option but costs more.
Steeper Learning Curve (Acro): Mastering tricks takes practice, especially with low power.
How to Get Started
Choose the Right Drone
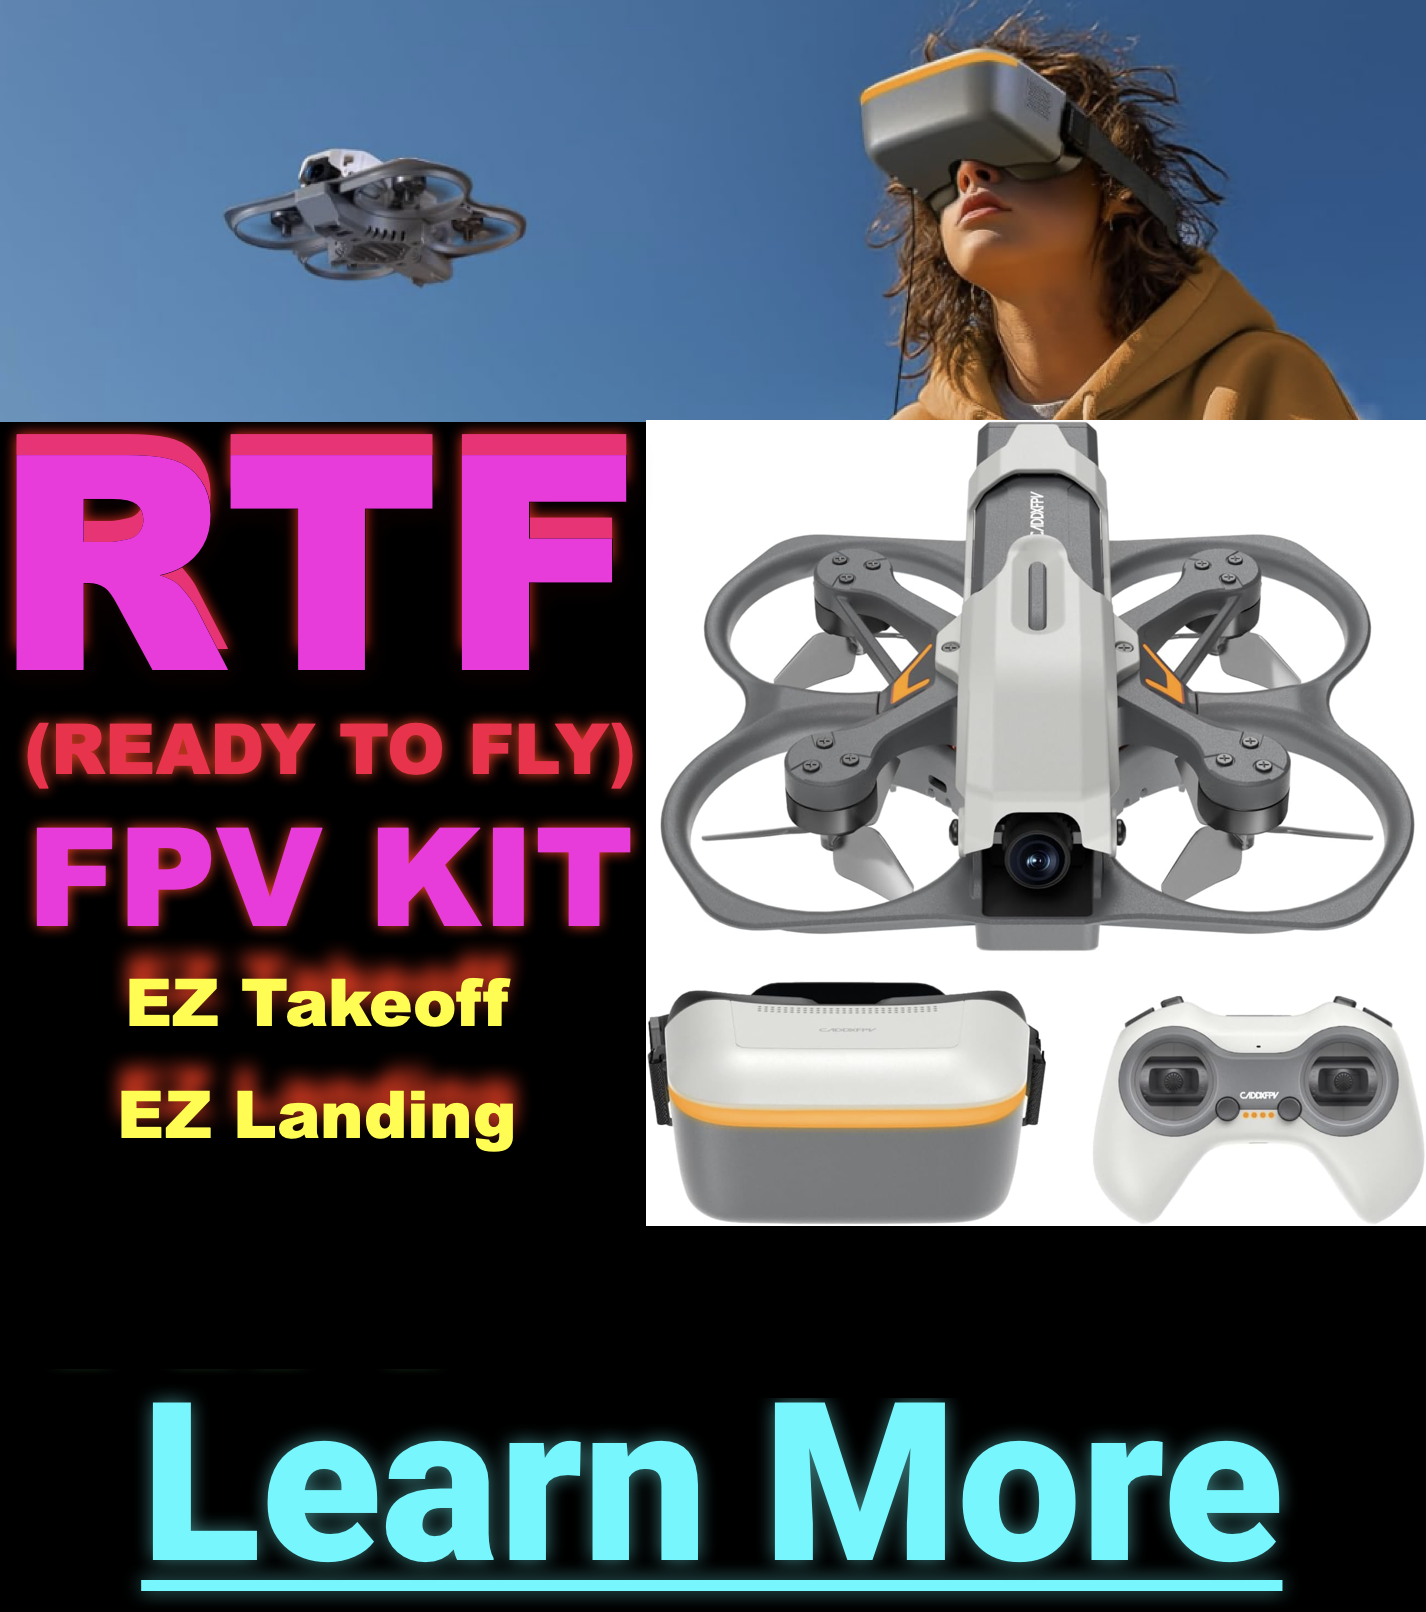
For beginners, ready-to-fly (RTF) kits are an easy way to jump in. They include drone, controller, and goggles.
BetaFPV Meteor65: Lightweight and agile, perfect for both beginners and pros.
EMAX TinyHawk II: Great for indoor and outdoor use with a solid performance balance.
HappyModel Mobula6: Compact and powerful, ideal for tight spaces.
NewBeeDrone AcroBee65: High-quality and beginner-friendly with great community support.
Practice Safely
Clear the flying area of obstacles, pets, and valuables.
Use stabilizing flight modes before attempting flips and tricks.
Practice regularly to improve control and confidence.
Use an FPV Simulator
Before taking to the skies, try an FPV simulator like FPV Logic, Liftoff Micro Drones, or VelociDrone to learn the basics without risking crashes.
Flying Tips for Newbies
Start Slow: Fly in an empty room or outside over grass with zero wind.
Stock Up on Batteries: You need extra packs to cycle them onto the charger while you rip!
Set Up Obstacles: Create a DIY course with household items or cardboard boxes.
Fly Responsibly: Stay aware of your surroundings and people nearby.
Analog, digital, HD—what actually matters when you pick goggles? Learn how to match video systems to your goals and budget.
Analog Goggles Overview
Let’s start with analog goggles. This is how I got into the hobby, and I still use this setup for freestyle flying. My goggles are Fat Shark HDO2s. They remain highly customizable:
Features:
Receiver: I use a TBS Fusion, though Rapidfire works well too.
Antennas: TBS Triumph Pro and a Mad Mushroom (omnidirectional to reduce breakup).
Patch Antenna: For specific cases like parking garages, I swap to a patch for penetration.
Optics: OLED screens with adjustable diopters.
DVR: Built-in recording to microSD.
Cost Estimate (High-End Analog):
Goggles: ~$500
Receiver: ~$120
Antennas & Battery: ~$70
Total: ~$700 (Lasts 5-6 years, averaging ~$100/year)
Why I Prefer Analog for Freestyle
For freestyle flying, I prefer analog due to the lower latency compared to DJI systems. While DJI is improving, I still feel a delay that affects precision. Additionally, analog is cheaper to repair when you crash (cameras/VTXs cost ~$70 combined).
Before you commit to a 5" build, understand power, weight, parts compatibility, and what changes when you leave micro quads behind.
The Freestyle Quad Breakdown
First up is my freestyle quad. I’m currently flying an analog signal (check Step 4 if you missed that!). This particular quad is built on the first-edition Apex frame. It’s a legacy product with older onboard electronics that aren’t made anymore, making it unique.
Build Note: If you’re building an analog quad today, the parts might be different from what I’m using. Most beginners lean towards DJI quads because they’re simpler, more plug-and-play, and feature modern digital setups.
My Freestyle Quad Breakdown
Key Components:
Camera Mount: 3D-printed mount for Action 2 (or GoPro).
Motors: 4x 2306 1850kV Vulcan motors.
ESC: FETtec 45A ESC.
Flight Controller: FETtec G4 board (Brain of the quad).
Power: 6S Battery (6 cells). Includes capacitors to filter voltage spikes.
Video System: Nebula Pro camera paired with an older DJI Air Unit. (Note: This is my digital setup).
Receiver: Tracer receiver.
Tip: Wiring harnesses vary. Buy a "matched stack" to avoid compatibility issues.
Getting Started: DIY FPV Build vs. Buy
There are a few ways to get into freestyle quads:
1. DIY Build
Source the parts individually. Offers full customization but requires research and technical knowledge.
2. Pre-Built (Bind-and-Fly)
Ready-to-fly drones. Just bind your radio. Keep in mind potential quality and compatibility issues, especially for repairs.
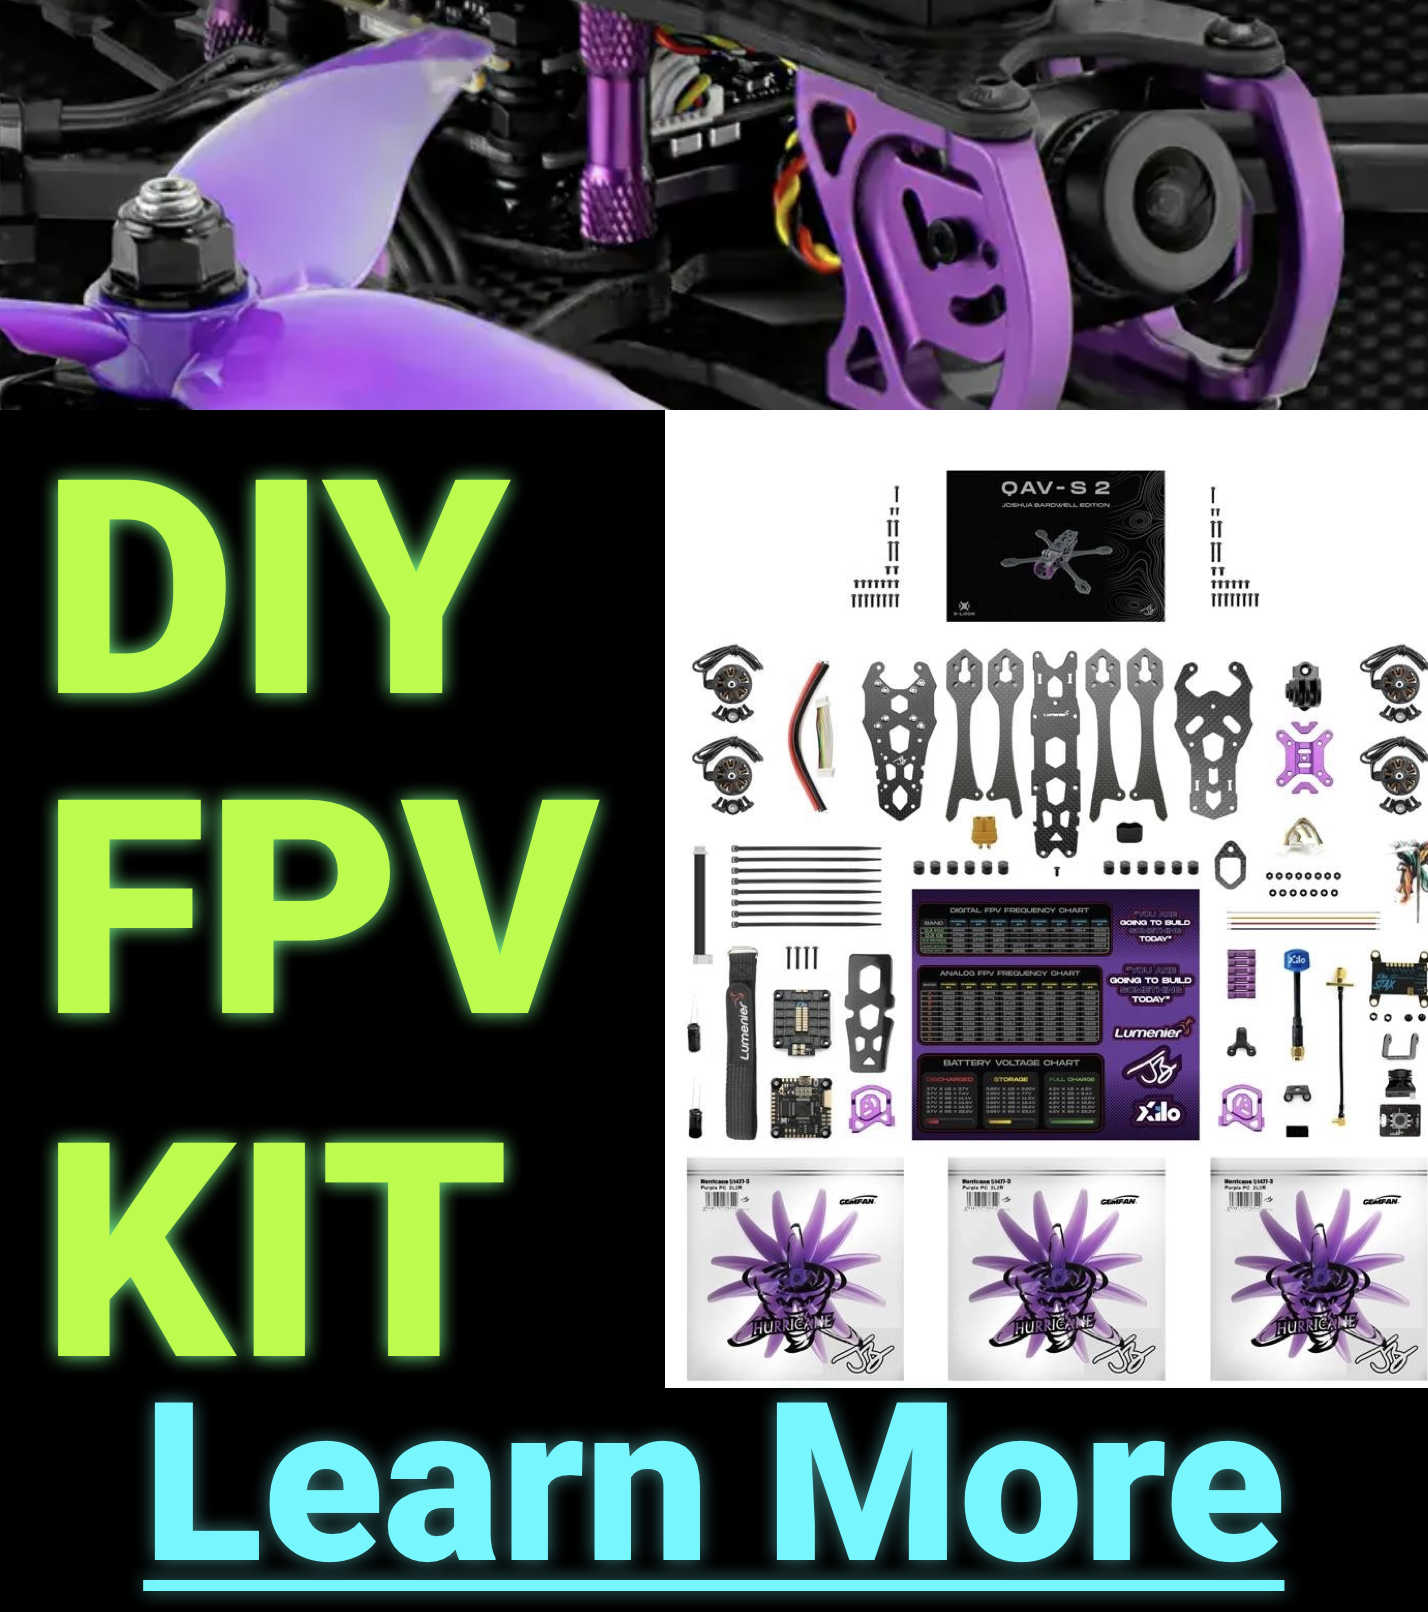
3. Build Kits (Recommended)
Kits come with all necessary components and often include detailed video instructions (like Joshua Bardwell's kits). They simplify the process and ensure compatibility.
Building or flying your first freestyle quad is an exciting journey. If I were starting today, I’d follow an existing build or use a comprehensive kit like the Bardwell options to avoid frustration. Thanks for watching the series!